Record Shopify sales and fees in QuickBooks Online in 3 steps - without using an app
If you're an e-commerce seller juggling both Shopify and QuickBooks Online for your business operations, you've probably explored various apps to connect these platforms and sync your financial data. If so, you’ve probably also encountered some challenges in trying to integrate these platforms seamlessly. Maybe you are looking for an alternative approach that is ideal for small sellers or those who want to avoid using integration apps. You’ve come to the right place! Keep reading and we’ll walk you through how to record Shopify sales and fees in QuickBooks Online in 3 steps - without using an app.
Is this method right for you?
Before we dive in to look at recording Shopify sales and fees in QuickBooks Online in 3 steps without an app, here are some things that you need to keep in mind. This no app method may not be right for you. This process is based on entering summarized monthly transactions into QuickBooks using journal entries and you will not be using an integrator app. Generally, this is a good fit for either small sellers or maybe those who are just getting started and not ready to commit to an app yet. It may be a good fit if you’re using just a few payment processors or if you’re only using Shopify payments.
There are some limitations to this way of recording transactions in QuickBooks as well. Because of the timing differences in Shopify between whenever it processes sales and when it processes payouts, there will be some differences that we will have to record to a clearing account. Let’s take a deeper look into what that entails.
Getting QuickBooks ready for Shopify
Where do we start? We first need to do a little bit of setup in QuickBooks in order to set up the account categories that we will need. We're going to add accounts to the QuickBooks Online chart of accounts. To do this, you'll need to download the free Shopify Bookkeeping Blueprint linked here. This will give you the account categories that you will need to use to customize your chart of accounts. These accounts will be specific to Shopify, so your QuickBooks chart of accounts will not have these accounts and these categories until you add them.
We will first add the Shopify Clearing account as an Other Current Asset type account in your chart of accounts. After setting up the Shopify Clearing account, you will then need to set up the other accounts as indicated in the Shopify Bookkeeping Blueprint.
To watch a video demonstration of setting up the Shopify Clearing account in QuickBooks Online, click here.
Step #1 - Record Shopify income
Are you ready to get started? After all accounts have been added to the chart of accounts in QuickBooks Online, we are ready to record Shopify income using a journal entry.
Download the Finances Summary report
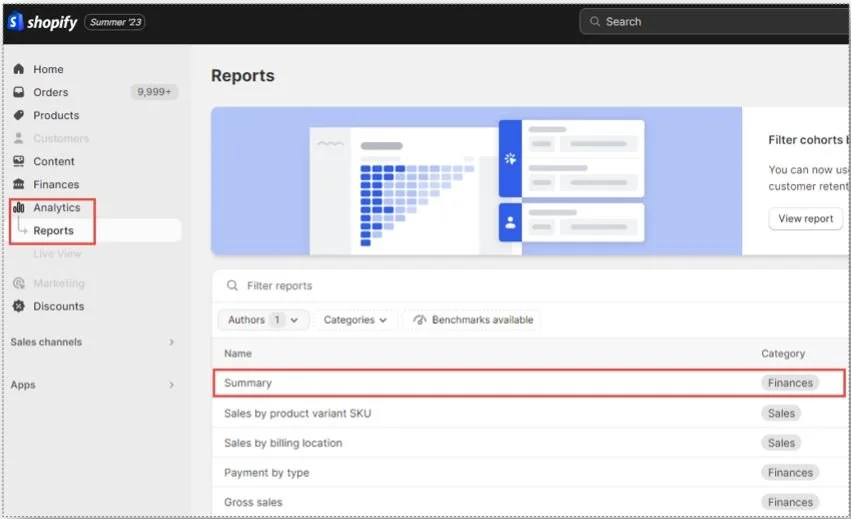
First we’ll need to run a Finances Summary report in Shopify. To find the right report, you’ll go to Analytics, then Reports, and then select Summary.
Next, you'll need to change the date range of the report. In the screenshot below, we’re changing the date range to last month. After you modify to your desired date range you’ll click Apply to update the report.
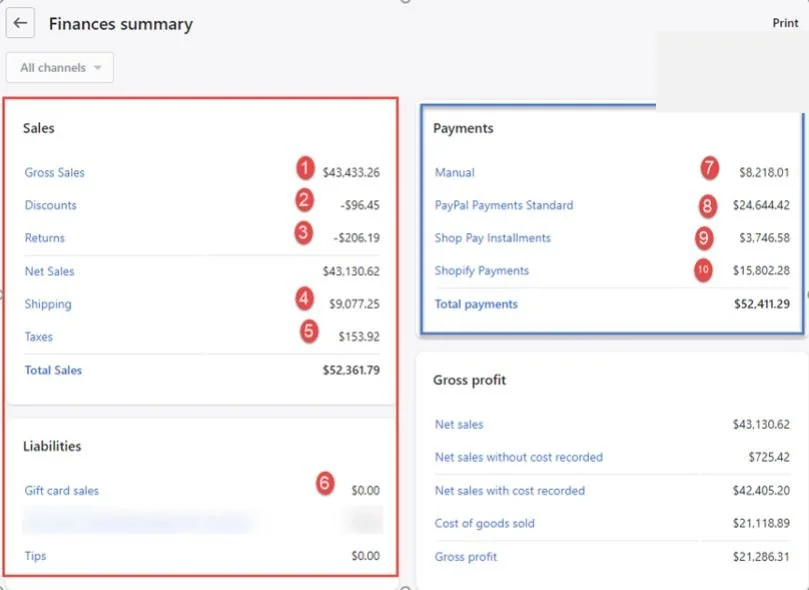
Let’s go over the different sections you’ll find on the finances summary report in Shopify. From the screenshot below, you’ll see Sales and Liabilities on the left side, and Payments (which are payouts) on the right side.
You’ll notice that we’ve coded some of the items on the Finances summary above with big red numbers. We’ll go over what those mean in just a moment.
Make the journal entry in QBO
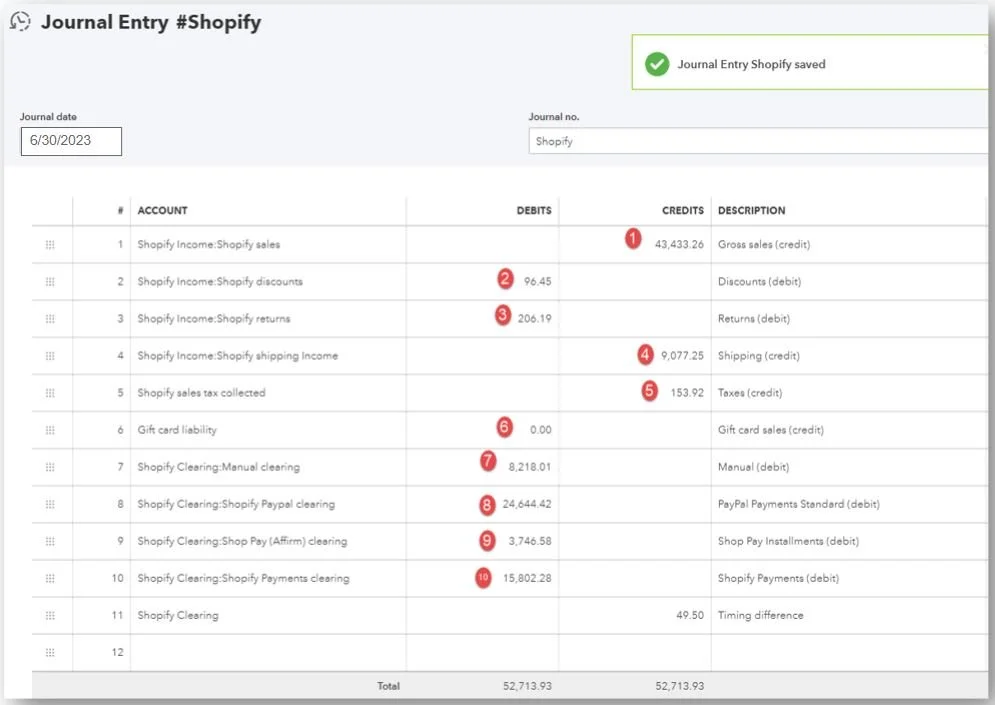
Next, we’ll need to make the journal entry in QuickBooks Online. First, you’ll need to go to QuickBooks Online and click the + New button, then select Journal Entry. You’ll need to change the Journal date and the Journal number, and then we have Accounts, Debits, Credits, and Description.
Take a look at the screenshots above and let’s make sense of this journal entry. Remember that we coded each of the transactions that we will be using from the Finances summary in big red numbers. You’ll find the corresponding line on the journal entry example above coded with the same number. We already set up all the accounts used in this journal entry using Shopify Bookkeeping Blueprint, so use that for your reference as needed.
In the description for each line on the journal entry we will note whether the amount on that line goes under the Debits column or Credits column for clarity. You’ll notice from the Finances summary that we have some negative amounts, like Discounts and Returns. Any negative numbers from the Finances summary will go under the Debits column in your journal entry, but we do not want to enter any negative signs in the journal entry.
Let’s go over a few examples of recording journal entry lines for our Finances summary report above.
Gross Sales
In our example above, Gross Sales is coded as number one. So on the first line of the journal entry, you’ll enter the gross sales amount from the Finances summary in the Credits column and categorize the Account as Shopify income:Shopify sales. In the Description column, we put “Gross sales (credit)”.
Discounts and Returns
Next, let’s look at how to handle Discounts (coded as number two in the example) and Returns (coded as number three in the example). Since these amounts are negative on the Finances summary report, they will be added in the Debits column in the journal entry. Remember, do not add a negative sign.
Payments
For the Payments, you will need to make sure that you have set up clearing accounts for each of your payment processors. Those instructions are given to you in the Shopify Bookkeeping Blueprint. Total sales and total payments will be different because of timing differences.
The Shopify Clearing account
You will continue to enter all of the transactions coded in red numbers on our example Finances summary to the corresponding line indicated in the journal entry. After you go through and enter everything as indicated, you will likely have a difference. The differences are entered to Shopify Clearing. QuickBooks will actually auto-calculate the difference for you. At the end, the total debits and total credits must equal.
When you’re done, make sure to save and close your journal entry.
If you would like to see a demonstration of these steps for recording the journal entry into QuickBooks Online, click here to watch this part of our video.
Step #2 - Record payment processor fees
Next we’ll go over how to record payment processor fees. It’s important to note that the amounts deposited from payment processors are net of fees and that those payment processor fees need to be recorded. If they're not recorded, then your payment processor clearing accounts will not balance. You'll also be missing out on some tax deductions because your payment processor fees will not be recorded.
Download the Shopify Payouts report
We first need to the Shopify Payouts report and get the fees that we need for our entries. To run the Shopify Payouts report from Shopify, go to Finances, select Payouts. From the upper right, select Transactions and then select Export. You’ll be prompted to select a transaction range for your report. You’ll want to export as a CSV for Excel and select Export Items. The report will be delivered to your email address to download the file.
Calculate the fees
On the Shopify Payouts report that you downloaded, find the column that shows the fees, and then scroll to the bottom of the report. Add a formula to total all of the fees in that column. This is the amount that you will need to record the fees in QuickBooks Online.
To see a demonstration of downloading the report and totaling the fees, click here to watch this part in our video.
Make the journal entry in QBO
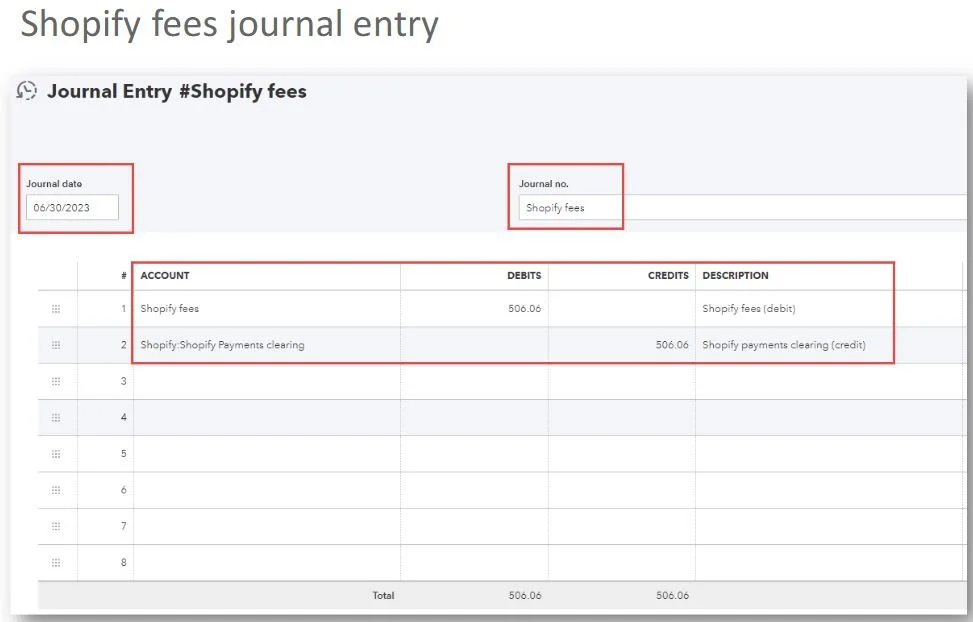
Now we’re going to make the journal entry in QuickBooks Online. Click the + New button, then select Journal Entry. You’ll need to change the Journal date and the Journal number. The date will be at the end of the month of which you’re recording fees. You’ll use “Shopify fees” for the journal number. See the example below.
As shown in the example above, for the first row of your journal entry, use the account category of Shopify fees. Debit the fee for the amount from the Payouts Report. Enter another line for Shopify Payments Clearing, and put that in the Credits column. The description for the first line will be “Shopify Fees (debit)”. Then the next line is “Shopify Payments Clearing (credit)”.
When you’re done, make sure to save and close your journal entry.
Recording Amazon Pay fees
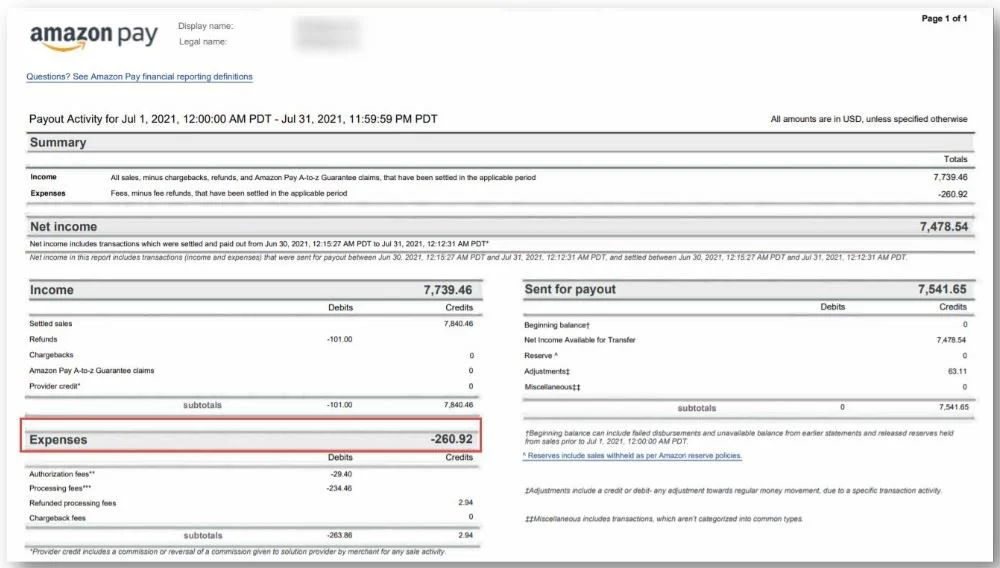
As an example of how to record other payment processor fees, we’ll take a look at how to record for Amazon Pay fees. From Amazon, you’ll need to find the Report of fees and then find the amount of expenses on that report. See an example below of where to find the expenses on that report.
Make the journal entry in QBO
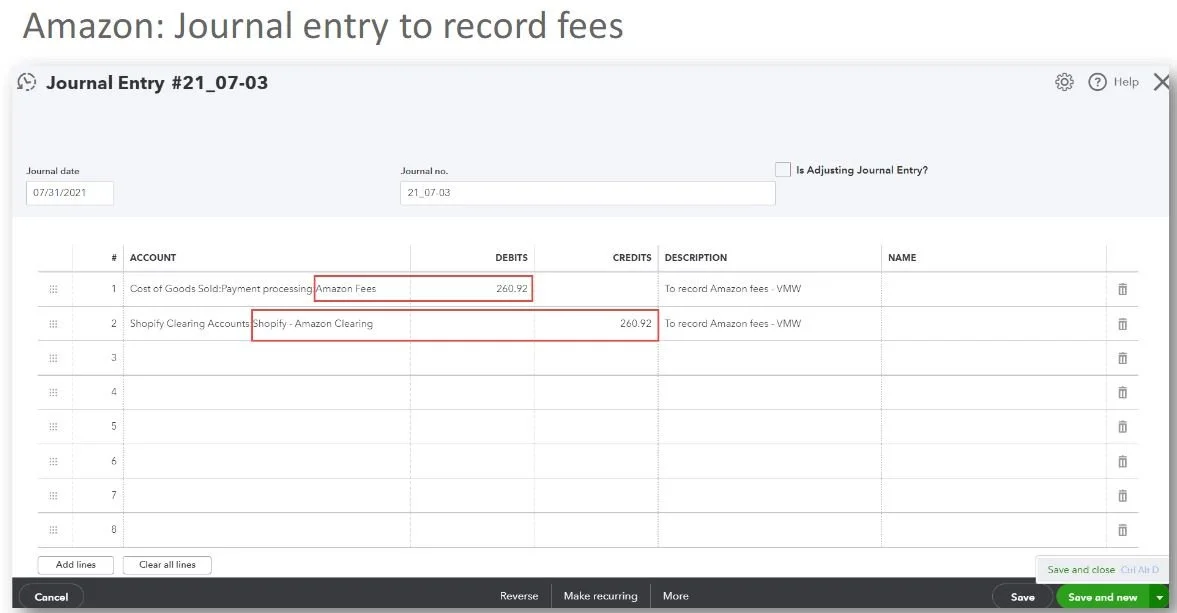
Next you’ll make the journal entry in QuickBooks Online. Click the + New button, then select Journal Entry. You will debit the Amazon fees account for the amount that was on the report. You will then create a second line and credit Shopify - Amazon Clearing for the same amount. See our example of this journal entry below.
Debits and Credits for payment processor fees
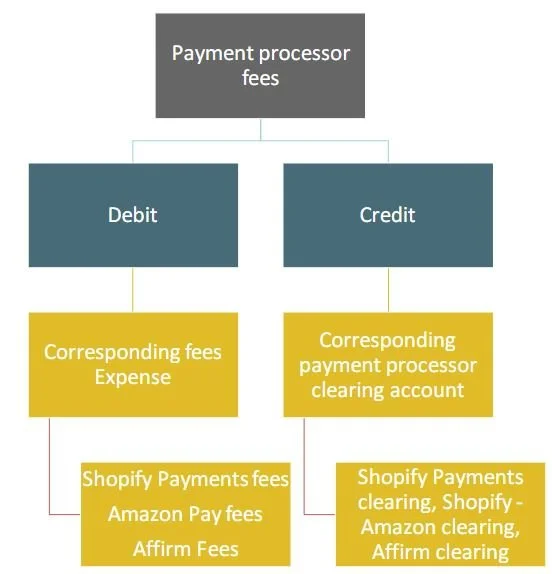
This can get a little bit confusing to keep track of all the debits and credits when recording a journal entry for payment processor fees. Here’s a diagram to help make things more clear.
As you can see in the chart above, we're going to debit or put amounts in the debits column for the expense. We're going to use an account that corresponds to the payment process or expense that we're using. That might be Shopify Payment fees, Amazon Pay fees, Affirm fees, or whatever kind of fees you have.
For the credits column, use the corresponding payment process or clearing account. These might be Shopify Payments clearing, Shopify - Amazon clearing, Affirm clearing, etc.
So, debits are expenses, and credits are the payment process or clearing accounts.
To see an example of this in our video, click here.
Step #3 - Categorize deposits from payment processors
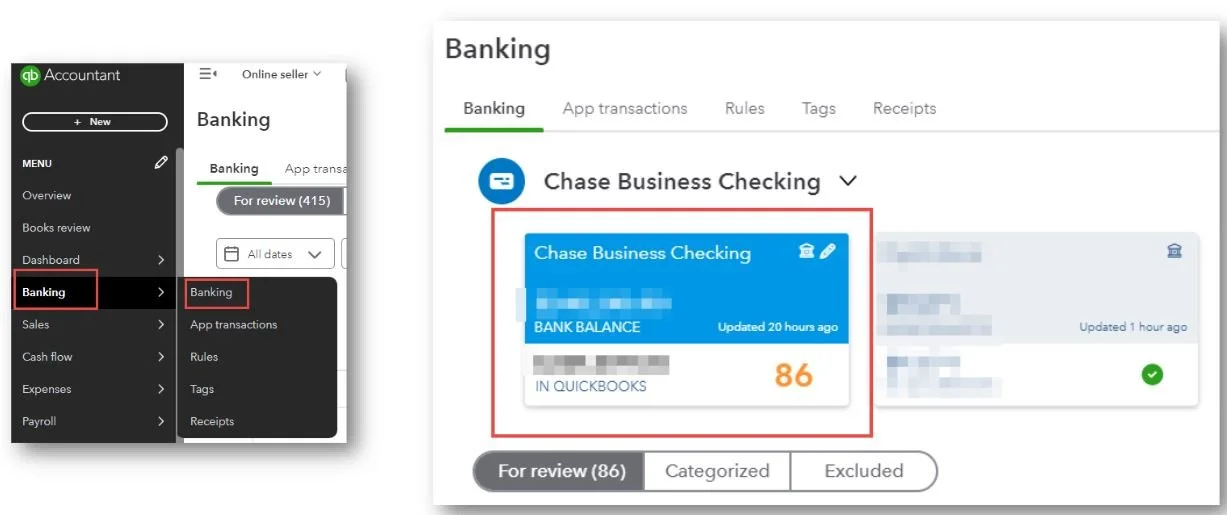
Finally, it’s time for our last step, to categorize deposits from payment processors. We’re going to start by going to the QuickBooks Banking transactions. In QuickBooks from the left side menu, go to Banking and select Banking, and then find the bank account that receives all of the deposits from your payment processors.
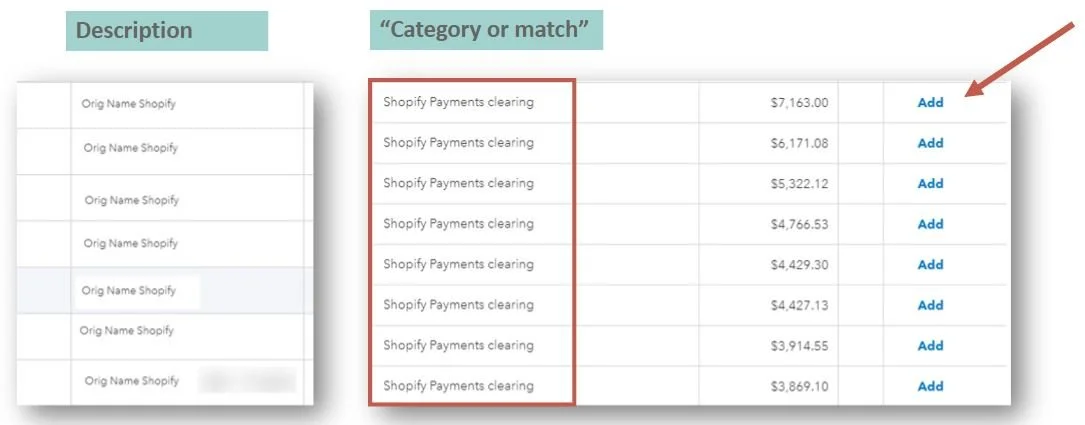
In your bank feed, look for the deposits from Shopify. They may say “Shopify”, but sometimes they don’t, so you’ll need to know which deposits they are. That will show up in the description in the bank feeds. See an example below of what to look for in your bank feeds.
For the category or match, change the account category to Shopify Payments Clearing. Then, go to the right and click Add to add those transactions to QuickBooks and categorize them properly without duplicating income.
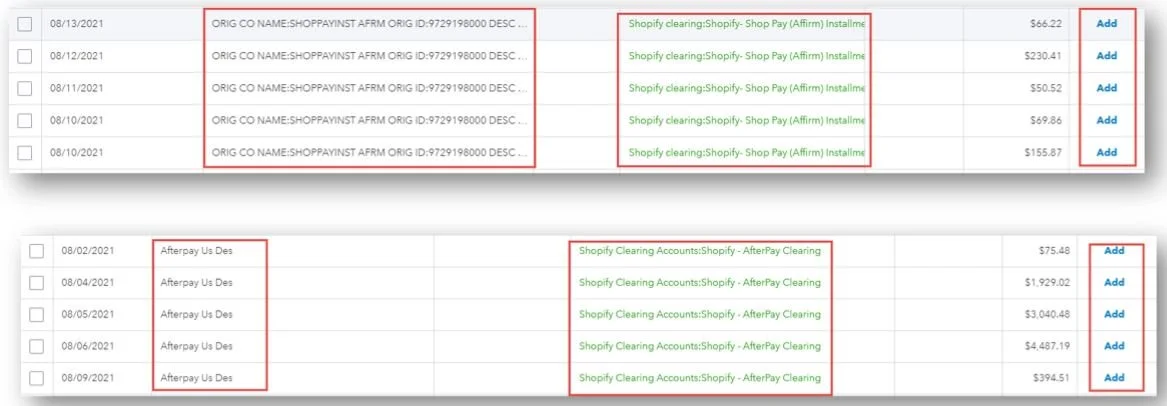
For categorizing other payment gateways to their corresponding clearing accounts, we will look at Shop Pay Affirm and AfterPay in the example below.
You’ll record the Shop Pay Affirm deposits to the Shopify Shop Pay Affirm Clearing account. If you're using AfterPay, for example, you will categorize them to the AfterPay Clearing account.
Again, Add them in the bank feed and that will get those transactions into your QuickBooks.
To see a demonstration in our video of categorizing deposits from other payment processors, click here.
Closing and Resources
That’s how to record Shopify sales and fees in QuickBooks Online in 3 easy steps without using an app. By carefully following these steps and setting up the required accounts, you can maintain accurate financial records for your e-commerce business. Need some more expert guidance? If you are ready to work with a trusted and reliable Shopify bookkeeping team, you can use this link to learn more about Mavency to see if we are a good fit for working together. For some additional support for your DIY Shopify bookkeeping, check out the free and paid resources linked below:
A2X - Sign up to use A2X for your Shopify to QuickBooks Online integration and receive 20% off your first 6 months by using our discount code: A2XMAVENCY
We hope to connect with you soon!


